使用 UCX 和 DGX 进行高性能网络实验
作者:Matthew Rocklin, Rick Zamora
这篇文章是关于实验性和快速变化的软件。本文中的代码示例不能保证将来仍能工作。
执行摘要
本文讨论了如何将高性能网络库 UCX 连接到并行 Python 库 Dask,以加速通信密集型工作负载,尤其是在使用 GPU 时。
此外,我们在 DGX 上进行了这项工作,DGX 是一款具有复杂内部网络的高端多 CPU 多 GPU 机器。在这种环境下工作有助于改进 Dask 在异构环境中的设置,包括针对不同的网卡、CPU 插槽、GPU 等进行配置。
动机
许多分布式计算工作负载受限于通信。这在以下情况下很常见
- DataFrame 连接
- 机器学习算法
- 复杂数组计算
随着我们加速计算(例如使用 GPU 进行计算),通信成为更大的瓶颈。
历史上,高性能通信只能通过 MPI 或定制解决方案实现。本文介绍了一项努力,旨在在保持 Dask 这种动态系统的可编程性和易用性的同时,接近 MPI 的通信带宽。
UCX, Python 和 Dask
为了在 Dask 中实现高性能网络,我们用 Python 封装了 UCX,然后将其连接到 Dask。
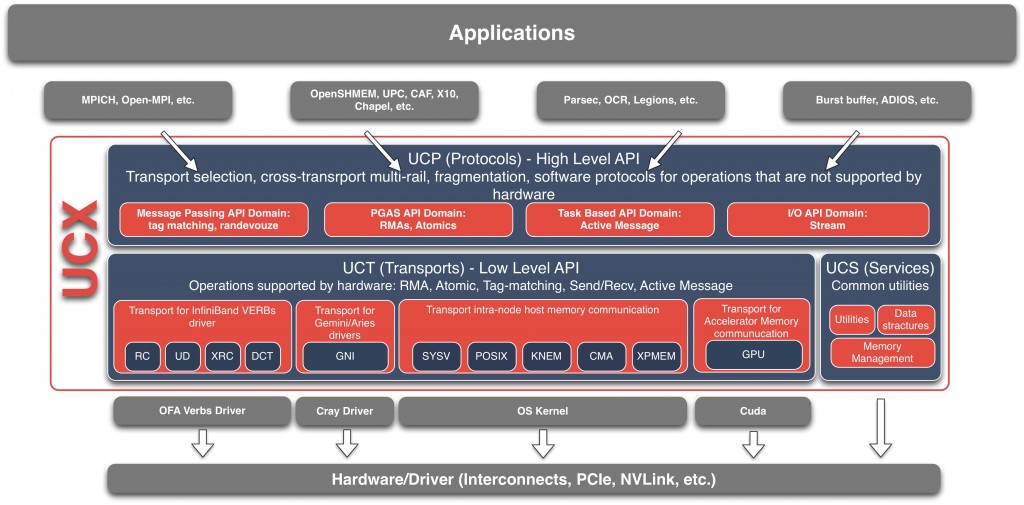
OpenUCX 项目为各种高性能网络库(如 InfiniBand、传统网络协议(如 TCP/共享内存)以及 GPU 特定的协议(如 NVLink))提供了统一的 API。它位于 OpenMPI(目前 OpenUCX 的主要用户)等之下的一层,负责确定使用哪种网络系统。
今天的 Python 用户无法很好地访问这些网络库,除非通过 MPI,但这有时并不理想。(尝试在 PyPI 上搜索“infiniband”。)
这促使我们创建了 UCX-Py 。UCX-Py 是 UCX C 库的 Python 封装,它提供了一个 Python 风格的 API,既有适合传统 HPC 程序的阻塞语法,也有适合更并发程序(如 Dask)的非阻塞 async/await 语法。有关 UCX 的更多信息,我推荐观看 Akshay 在 2019 年 GPU 技术大会上的 UCX 演讲。
注意:UCX-Py 主要由 Akshay Venkatesh (UCX, NVIDIA)、Tom Augspurger (Dask, Pandas, Anaconda) 和 Ben Zaitlen (NVIDIA, RAPIDS, Dask) 开发)
然后,我们扩展了 Dask 通信,使其可以选择使用 UCX。如果您安装了 UCX 和 UCX-Py,那么在启动时可以在地址中使用 ucx:// 协议或使用 --protocol ucx 标志,例如这样。
$ dask-scheduler --protocol ucx
Scheduler started at ucx://127.0.0.1:8786

$ dask-worker ucx://127.0.0.1:8786
>>> from dask.distributed import Client
>>> client = Client('ucx://127.0.0.1:8786')
实验
我们修改了我们的使用 Dask 和 CuPy 进行 SVD 的基准测试,使其使用 UCX 协议进行进程间通信,并在半台 DGX 机器上运行,使用了四个 GPU。以下是启用 UCX 的代码的最小实现
import cupy
import dask
import dask.array
from dask.distributed import Client, wait
from dask_cuda import DGX

# Define DGX cluster and client
cluster = DGX(CUDA_VISIBLE_DEVICES=[0, 1, 2, 3])
client = Client(cluster)

# Create random data
rs = dask.array.random.RandomState(RandomState=cupy.random.RandomState)
x = rs.random((1000000, 1000), chunks=(10000, 1000))
x = x.persist()

# Perform distributed SVD
u, s, v = dask.array.linalg.svd(x)
u, s, v = dask.persist(u, s, v)
_ = wait([u, s, v])
通过使用 UCX,整体通信时间减少了一个数量级。为了生成下面的任务流图,基准测试在设置了 CUDA_VISIBLE_DEVICES=[0,1,2,3] 的 DGX-1 上运行。很明显,代表进程间通信的红色任务条被显著压缩。以前需要 500ms-1s 的通信现在只需大约 20ms。
使用 UCX 前:
使用 UCX 后:
深入细节
在使用了 NVLink 的 GPU 上,一对 GPU 之间的吞吐量可以达到 5-10 GB/s。在 CPU 上,这个速度会下降到 1-2 GB/s(这似乎远低于最佳水平)。这些速度会影响所有 Dask 工作负载(数组、dataframe、xarray、机器学习等),但当存在合适的硬件时,可能会出现其他瓶颈,例如处理文本或 JSON 类数据时的序列化。
当然,这取决于是否存在这种高级网络硬件。在上面的 GPU 示例中,我们主要依靠 NVLink,但在 HPC InfiniBand 网络上,甚至在使用共享内存传输的单台笔记本电脑上,我们也能获得改进的性能。
上面的示例在一台 DGX 机器上运行,该机器包含了所有这些传输方式以及更多(以及众多的 GPU)。
DGX
上面使用的测试机器是 DGX-1,它有八个 GPU、两个 CPU 插槽、四块 Infiniband 网卡以及复杂的 NVLink 连接。这是一个很好的非均匀硬件示例。某些 CPU 与某些 GPU 和网卡之间的距离更近,理解这种距离对性能有数量级的影响。这种情况并非 DGX 机器独有。同样的情况也会出现在以下场景中…
- 一个节点中有多个 worker,一个集群中有多个节点
- 一个机架中有多个节点,一个数据中心中有多个机架
- 多个数据中心,例如混合云的情况
使用 DGX 工作很有趣,因为它迫使我们开始思考异构性,并使使用 Dask 指定复杂的部署场景变得更容易。
这是一张图,显示了 DGX-1 中 GPU、CPU 和 Infiniband 网卡如何相互连接

这里是 nvidia-smi 的输出,显示了 NVLink、网络和 CPU 亲和结构(这与上面显示的结构基本正交)。
$ nvidia-smi  topo -m
     GPU0  GPU1  GPU2  GPU3  GPU4  GPU5  GPU6  GPU7   ib0   ib1   ib2   ib3
GPU0   X    NV1   NV1   NV2   NV2   SYS   SYS   SYS   PIX   SYS   PHB   SYS
GPU1  NV1    X    NV2   NV1   SYS   NV2   SYS   SYS   PIX   SYS   PHB   SYS
GPU2  NV1   NV2    X    NV2   SYS   SYS   NV1   SYS   PHB   SYS   PIX   SYS
GPU3  NV2   NV1   NV2    X    SYS   SYS   SYS   NV1   PHB   SYS   PIX   SYS
GPU4  NV2   SYS   SYS   SYS    X    NV1   NV1   NV2   SYS   PIX   SYS   PHB
GPU5  SYS   NV2   SYS   SYS   NV1    X    NV2   NV1   SYS   PIX   SYS   PHB
GPU6  SYS   SYS   NV1   SYS   NV1   NV2    X    NV2   SYS   PHB   SYS   PIX
GPU7  SYS   SYS   SYS   NV1   NV2   NV1   NV2    X    SYS   PHB   SYS   PIX
ib0   PIX   PIX   PHB   PHB   SYS   SYS   SYS   SYS    X    SYS   PHB   SYS
ib1   SYS   SYS   SYS   SYS   PIX   PIX   PHB   PHB   SYS    X    SYS   PHB
ib2   PHB   PHB   PIX   PIX   SYS   SYS   SYS   SYS   PHB   SYS    X    SYS
ib3   SYS   SYS   SYS   SYS   PHB   PHB   PIX   PIX   SYS   PHB   SYS    X

    CPU Affinity
GPU0  0-19,40-59
GPU1  0-19,40-59
GPU2  0-19,40-59
GPU3  0-19,40-59
GPU4  20-39,60-79
GPU5  20-39,60-79
GPU6  20-39,60-79
GPU7  20-39,60-79

Legend:

  X    = Self
  SYS  = Traverse PCIe as well as the SMP interconnect between NUMA nodes
  NODE = Travrese PCIe as well as the interconnect between PCIe Host Bridges
  PHB  = Traverse PCIe as well as a PCIe Host Bridge (typically the CPU)
  PXB  = Traverse multiple PCIe switches (without PCIe Host Bridge)
  PIX  = Traverse a single PCIe switch
  NV#  = Traverse a bonded set of # NVLinks
DGX 最初设计用于深度学习应用。上面的复杂网络基础设施可以很好地被专用的 NVIDIA 网络库(如 NCCL)利用,NCCL 知道如何正确路由,但这对于 Dask 等更通用的系统来说是适应的挑战。
幸运的是,在应对这一挑战时,我们能够解决 Dask 中的一些相关问题。特别是,我们现在可以
- 在启动本地集群时指定更异构的 worker 配置 dask/distributed #2675
- 随时间学习带宽 dask/distributed #2658
- 添加 Worker 插件以帮助处理 CPU 亲和性等问题(尽管这非常通用) dask/distributed #2453
通过这些更改,我们现在能够在下面的 Python 函数中将大多数 DGX 结构描述为配置
import os

from dask.distributed import Nanny, SpecCluster, Scheduler
from distributed.worker import TOTAL_MEMORY

from dask_cuda.local_cuda_cluster import cuda_visible_devices


class CPUAffinity:
    """ A Worker plugin to pin CPU affinity """
    def __init__(self, cores):
        self.cores = cores

    def setup(self, worker=None):
        os.sched_setaffinity(0, self.cores)


affinity = {  # See nvidia-smi topo -m
    0: list(range(0, 20)) + list(range(40, 60)),
    1: list(range(0, 20)) + list(range(40, 60)),
    2: list(range(0, 20)) + list(range(40, 60)),
    3: list(range(0, 20)) + list(range(40, 60)),
    4: list(range(20, 40)) + list(range(60, 79)),
    5: list(range(20, 40)) + list(range(60, 79)),
    6: list(range(20, 40)) + list(range(60, 79)),
    7: list(range(20, 40)) + list(range(60, 79)),
}

def DGX(
    interface="ib",
    dashboard_address=":8787",
    threads_per_worker=1,
    silence_logs=True,
    CUDA_VISIBLE_DEVICES=None,
    **kwargs
):
    """ A Local Cluster for a DGX 1 machine

    NVIDIA's DGX-1 machine has a complex architecture mapping CPUs,
    GPUs, and network hardware.  This function creates a local cluster
    that tries to respect this hardware as much as possible.

    It creates one Dask worker process per GPU, and assigns each worker
    process the correct CPU cores and Network interface cards to
    maximize performance.

    That being said, things aren't perfect.  Today a DGX has very high
    performance between certain sets of GPUs and not others.  A Dask DGX
    cluster that uses only certain tightly coupled parts of the computer
    will have significantly higher bandwidth than a deployment on the
    entire thing.

    Parameters
    ----------
    interface: str
        The interface prefix for the infiniband networking cards.  This is
        often "ib"` or "bond".  We will add the numeric suffix 0,1,2,3 as
        appropriate.  Defaults to "ib".
    dashboard_address: str
        The address for the scheduler dashboard.  Defaults to ":8787".
    CUDA_VISIBLE_DEVICES: str
        String like ``"0,1,2,3"`` or ``[0, 1, 2, 3]`` to restrict
        activity to different GPUs

    Examples
    --------
    >>> from dask_cuda import DGX
    >>> from dask.distributed import Client
    >>> cluster = DGX(interface='ib')
    >>> client = Client(cluster)
    """
    if CUDA_VISIBLE_DEVICES is None:
        CUDA_VISIBLE_DEVICES = os.environ.get("CUDA_VISIBLE_DEVICES", "0,1,2,3,4,5,6,7")
    if isinstance(CUDA_VISIBLE_DEVICES, str):
        CUDA_VISIBLE_DEVICES = CUDA_VISIBLE_DEVICES.split(",")
    CUDA_VISIBLE_DEVICES = list(map(int, CUDA_VISIBLE_DEVICES))
    memory_limit = TOTAL_MEMORY / 8

    spec = {
        i: {
            "cls": Nanny,
            "options": {
                "env": {
                    "CUDA_VISIBLE_DEVICES": cuda_visible_devices(
                        ii, CUDA_VISIBLE_DEVICES
                    ),
                    "UCX_TLS": "rc,cuda_copy,cuda_ipc",
                },
                "interface": interface + str(i // 2),
                "protocol": "ucx",
                "ncores": threads_per_worker,
                "data": dict,
                "preload": ["dask_cuda.initialize_context"],
                "dashboard_address": ":0",
                "plugins": [CPUAffinity(affinity[i])],
                "silence_logs": silence_logs,
                "memory_limit": memory_limit,
            },
        }
        for ii, i in enumerate(CUDA_VISIBLE_DEVICES)
    }

    scheduler = {
        "cls": Scheduler,
        "options": {
            "interface": interface + str(CUDA_VISIBLE_DEVICES[0] // 2),
            "protocol": "ucx",
            "dashboard_address": dashboard_address,
        },
    }

    return SpecCluster(
        workers=spec,
        scheduler=scheduler,
        silence_logs=silence_logs,
        **kwargs
    )
然而,我们从未完全掌握 NVLink 结构。Dask 调度器目前仍然假定 worker 之间的带宽是均匀的。我们已经开始朝着改变这一目标迈出一小步,但尚未完成(这对考虑机架内或跨数据中心部署的人来说也将很有用)。
像往常一样,在解决一个高度具体的问题时,我们能够解决许多悬而未决的通用功能,这使得我们的具体问题变得易于记录。
未来工作
过去几个月,我们付出了巨大努力使上述一切都能工作。特别是我们…
- 修改 UCX 以支持客户端-服务器工作负载
- 用 UCX-Py 封装 UCX,并设计一个对 Python async-await 友好的接口
- 用 Dask 封装 UCX-Py
- 将所有东西连接起来,使通用工作负载良好运行
结果相当不错,特别是对于通信密集型工作负载。然而,仍有许多工作要做。本节详细介绍了我们目前正在考虑继续这项工作的方向。
-
复杂网络内的路由:如果您将自己限制在 DGX 的八个 GPU 中的四个,那么一对 GPU 之间可以获得 5-12 GB/s 的速度。对于某些工作负载来说,这可能意义重大。它让系统感觉更像一个单一单元,而不是一堆孤立的机器。
然而,我们仍然无法在整个 DGX 上获得出色的性能,因为许多 GPU 对之间没有 NVLink 连接,因此速度会慢 10 倍。如果您天真地尝试使用整个 DGX,这些通信成本将成为主导。
这可以通过以下方式解决
- 教导 Dask 避免这些通信
- 教导 UCX 通过多个 NVLink 连接组成的链来路由此类通信
- 完全避免复杂网络。像 DGX-2 这样的新系统使用 NVSwitch,它提供统一的连接性,每个 GPU 都连接到其他所有 GPU。
编辑:我后来了解到 UCX 应该能够处理这个问题。一旦上游 bug 修复,即使没有 NVLink,我们仍然应该能获得 PCIe 速度(约 4-7 GB/s)。万岁!
-
CPU: 通过 InfiniBand 可以获得 1-2 GB/s 的速度,这不错,但也不是我们期望的 5-8 GB/s。这值得更深入的性能分析来确定问题所在。目前的猜测是这与内存分配有关。
In [1]: %time _ = b'0' * 1000000000  # 1 GB
CPU times: user 248 ms, sys: 223 ms, total: 472 ms
Wall time: 470 ms   # <<----- Around 2 GB/s.  Slower than I expected
可能我们只是在这里做了一些愚蠢的事情。
-
打包 UCX: 目前我正在从源代码构建 UCX 和 UCX-Py 库(请参阅下面的附录获取说明)。理想情况下,这些应该成为 conda 包。John Kirkham (Conda Forge, NVIDIA, Dask) 正在与 Mellanox 的 UCX 开发人员一起研究这个问题。
更多信息请参阅 ucx-py #65。
-
学习异构带宽: 为了做出好的调度决策,Dask 需要估算机器之间移动数据所需的时间。这个问题现在变得复杂得多,它取决于源机器和目标机器(网络拓扑)、数据类型(NumPy 数组、GPU 数组、带有文本的 Pandas Dataframe)等等。在复杂情况下,我们的带宽范围可能跨越 100 倍(100 MB/s 到 10 GB/s)。
Dask 将不得不开发更复杂的带宽模型,并随时间学习这些模型。
更多信息请参阅 dask/distributed #2743。
-
支持其他 GPU 库: 为了发送 GPU 数据,我们需要教导 Dask 如何将 Python 对象序列化到 GPU 缓冲区中。在 dask/distributed 仓库中有代码可以为 Numba、CuPy 和 RAPIDS cuDF 对象做到这一点,但我们实际上只对 CuPy 进行了认真测试。我们应该通过以下一些步骤来扩展这项工作
-
尝试分布式 Dask cuDF 连接计算
更多关于初步工作的信息请参阅 dask/distributed #2746。
-
教导 Dask 序列化数组 GPU 库,例如 PyTorch 和 TensorFlow,或者任何支持
__cuda_array_interface__协议的对象。
-
-
跟踪通信故障: 我们仍然偶尔会遇到无法解释的通信故障。我们应该对这个系统进行压力测试,以发现潜在问题。
-
TCP:拥有高性能 TCP 网络的团队尚无法使用 UCX+Dask(尽管他们可以单独使用其中一个)。
目前,像我们与 Dask 一样在客户端-服务器模式下使用 UCX 需要访问 RDMA 库,而没有 InfiniBand 等网络系统的系统通常找不到这些库。这意味着拥有高性能 TCP 网络的团队无法使用 UCX+Dask。
这项工作正在进行中,请参阅 openucx/ucx #3570
-
通用硬件:目前,此代码仅在高配备 InfiniBand 或 NVLink 的高性能 Linux 系统上真正有用。然而,如果能在更通用的系统上使用它会更好,包括使用 TCP 和共享内存的个人笔记本电脑。
目前,Dask 在单台机器上使用 TCP 进行进程间通信。在个人电脑上使用 UCX 将使我们能够访问共享内存速度,这通常要快一个数量级。
更多信息请参阅 openucx/ucx #3663。
-
性能调优: 目前我们在 NVLink 上看到的 5-10 GB/s 带宽并非最优。仅使用 UCX-Py,我们在大消息传输上可以获得约 15 GB/s 的速度。我们应该对实现进行基准测试和调优,以找出额外的时间消耗在哪里。不过,在系统更健壮之前,这是次要优先级。
附录:设置
执行这些实验目前取决于几个仓库的开发分支。本节包含我当前的设置。
创建 Conda 环境
conda create -n ucx python=3.7 libtool cmake automake autoconf cython bokeh pytest pkg-config ipython dask numba -y
注意:出于某种原因,使用 conda-forge 会导致下面的 autogen 步骤失败。
设置 UCX
# Clone UCX repository and get branch
git clone https://github.com/openucx/ucx
cd ucx
git remote add Akshay-Venkatesh [email protected]:Akshay-Venkatesh/ucx.git
git remote update Akshay-Venkatesh
git checkout ucx-cuda

# Build
git clean -xfd
export CUDA_HOME=/usr/local/cuda-9.2/
./autogen.sh
mkdir build
cd build
../configure --prefix=$CONDA_PREFIX --enable-debug --with-cuda=$CUDA_HOME --enable-mt --disable-cma CPPFLAGS="-I//usr/local/cuda-9.2/include"
make -j install

# Verify
ucx_info -d
which ucx_info  # verify that this is in the conda environment

# Verify that we see NVLink speeds
ucx_perftest -t tag_bw -m cuda -s 1048576 -n 1000 & ucx_perftest dgx15 -t tag_bw -m cuda -s 1048576 -n 1000
设置 UCX-Py
git clone [email protected]:rapidsai/ucx-py
cd ucx-py

export UCX_PATH=$CONDA_PREFIX
make install
设置 Dask
git clone [email protected]:dask/dask.git
cd dask
pip install -e .
cd ..
git clone [email protected]:dask/distributed.git
cd distributed
pip install -e .
cd ..
可选设置 cupy
pip install cupy-cuda92==6
可选设置 cudf
conda install -c rapidsai-nightly -c conda-forge -c numba cudf dask-cudf cudatoolkit=9.2
可选设置 JupyterLab
conda install ipykernel jupyterlab nb_conda_kernels nodejs
用于 Dask 面板
pip install dask_labextension
jupyter labextension install dask-labextension
我的基准测试
我一直使用以下基准测试来测试通信。它分配一个分块的 Dask 数组,然后将其与它的转置相加,这会强制进行大量通信,但计算量不大。
from collections import defaultdict
import asyncio
import time
import numpy as np
from pprint import pprint
import cupy

import dask.array as da
from dask.distributed import Client, wait
from distributed.utils import format_time, format_bytes

async def f():

    # Set up workers on the local machine
    async with DGX(asynchronous=True, silence_logs=True) as cluster:
        async with Client(cluster, asynchronous=True) as client:

            # Create a simple random array
            rs = da.random.RandomState(RandomState=cupy.random.RandomState)
            x = rs.random((40000, 40000), chunks='128 MiB').persist()
            print(x.npartitions, 'chunks')
            await wait(x)

            # Add X to its transpose, forcing computation
            y = (x + x.T).sum()
            result = await client.compute(y)

            # Collect, aggregate, and print peer-to-peer bandwidths
            incoming_logs = await client.run(lambda dask_worker: dask_worker.incoming_transfer_log)
            bandwidths = defaultdict(list)
            for k, L in incoming_logs.items():
                for d in L:
                    if d['total'] > 1_000_000:
                        bandwidths[k, d['who']].append(d['bandwidth'])
            bandwidths = {
                (cluster.scheduler.workers[w1].name,
                    cluster.scheduler.workers[w2].name): [format_bytes(x) + '/s' for x in np.quantile(v, [0.25, 0.50, 0.75])]
                for (w1, w2), v in bandwidths.items()
            }
            pprint(bandwidths)


if __name__ == '__main__':
    asyncio.get_event_loop().run_until_complete(f())
注意:这个示例的大部分内容只是获取诊断信息,可以轻松忽略。此外,如果你愿意,可以删除 async/await 代码。我认为世界上应该有更多使用 Dask 与 async/await 语法的示例,所以我决定保留它。
博客评论由 Disqus 提供支持